Using the manual mode
To understand what the manual mode is, there are a few basics to understand first. Generally, when an image is taken, various factors decide how the light on the sensor is processed into the finished digital image:
- The aperture: It determines how far the lens is opened and thus how much light hits the sensor, it’s comparable with the human iris.
- Exposure time: The exposure time determines how long the light hits the sensor, it’s important for capturing and freeze moments in for example sport-events or light trails.
- And the ISO setting: Which works as an image brightener when the camera suspects that an image is underexposed and thus balances the aperture & exposure time for a well-lit image (however, it has the disadvantage that the more the ISO brightens an image, the more quality is lost).
In automatic mode, the camera takes over the settings for these three components completely independently. Depending on which subject you focus on, the autopilot tries to illuminate this subject well and capture it as sharply as possible. In general automatic mode is pretty good for what it’s worth, it does a pretty well job of creating decent images, but it does not give you options to control a lot of factors, which you might not even know you can influence.
In addition, there are more modes on cameras in general, almost all camera systems have the following:
- Program Mode: Everything on auto, but the photographer has control over the lightness/darkness of the image.
- Shutter Priority: Controls how fast an image is taken.
- And aperture priority: Control over the opening of the iris
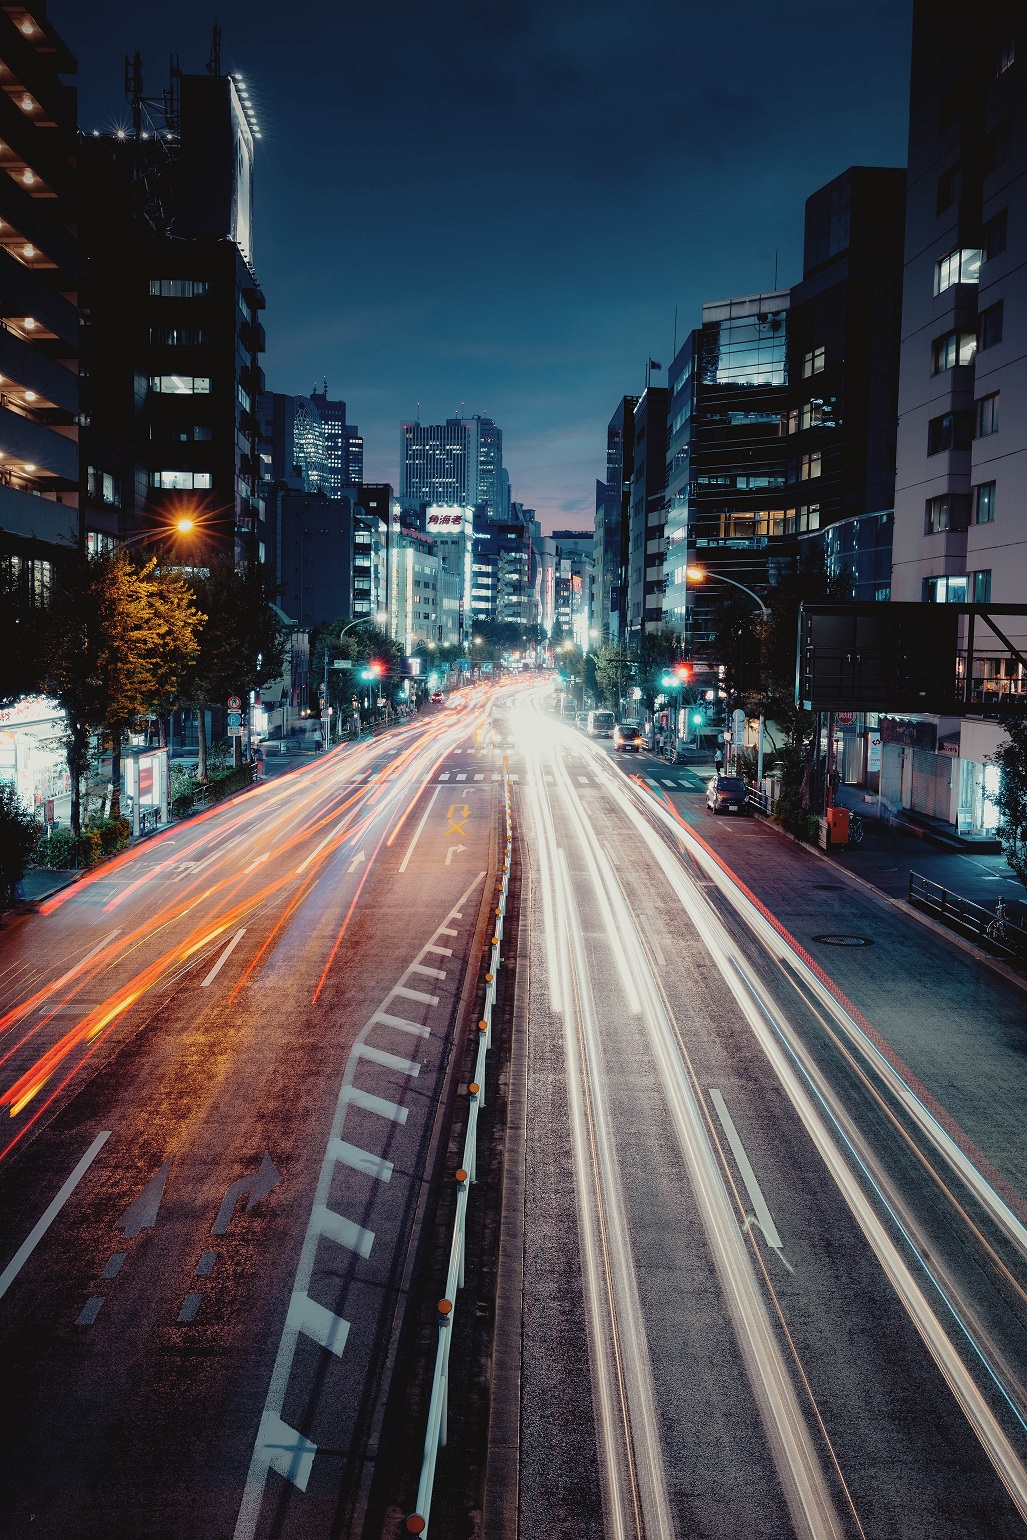
Each of these modes has different uses. If, for example, you want to have a barn below the horizon well exposed, despite a very bright sky and the automatic mode always photographs it too dark, then you switch to the program automatic. If you want a flower in the foreground to be sharp but the background blurry, the aperture priority will help, and if you want to freeze an athlete in the middle of a movement or record traces of car lights, then the shutter priority is required. The following image was taken with an exposure time of several seconds, with the camera on a tripod.
In manual mode, on the other hand, everything is done manually, as the name promises. This comes of course with:
Advantages & disadvantages
of the manual mode
-At the beginning you are slower because you have to set everything yourself
– If you don’t understand the individual aspects, the result can be a worse picture than in other modes
– Long learning curve
– Distracts from the composition at the beginning
– Once you’ve found your style, in technical aspects, it’s relatively quick
– You develop a better understanding of the technical aspects of photography
– You can get the most out of your gear and camera
– Complete control over the image & result
For those who have not yet tried manual mode, here are a few practical tips from me:
The choice of aperture and exposure time
Foremost, in low light conditions, a wide open aperture, like f1.8, is always a good idea as it allows shorter exposures and less risk of a blurred image. In addition, you do not need a high ISO value, which brings with it unsightly image noise. However, a small aperture value has the disadvantage that the sharpness range becomes smaller the further the aperture opens, i.e. the f-number becomes lower.
For example, with an aperture of f22, pretty much everything in the picture is sharp, but with an aperture of f1.4 (by the way, the camera sees just as well as an owl at night, at this aperture, just saying), you have to be incredibly precise with the focus. Modern cameras often have a reliable autofocus that automatically fixes itself exactly on the eye, but in practice the focus can be just over the eyelash hairs and with glasses you can almost completely forget about this feature, which is of course very annoying. Therefore, be careful when focusing with a low aperture. Time for a case study, because a picture speaks more than 1000 words:
Technical balancing act
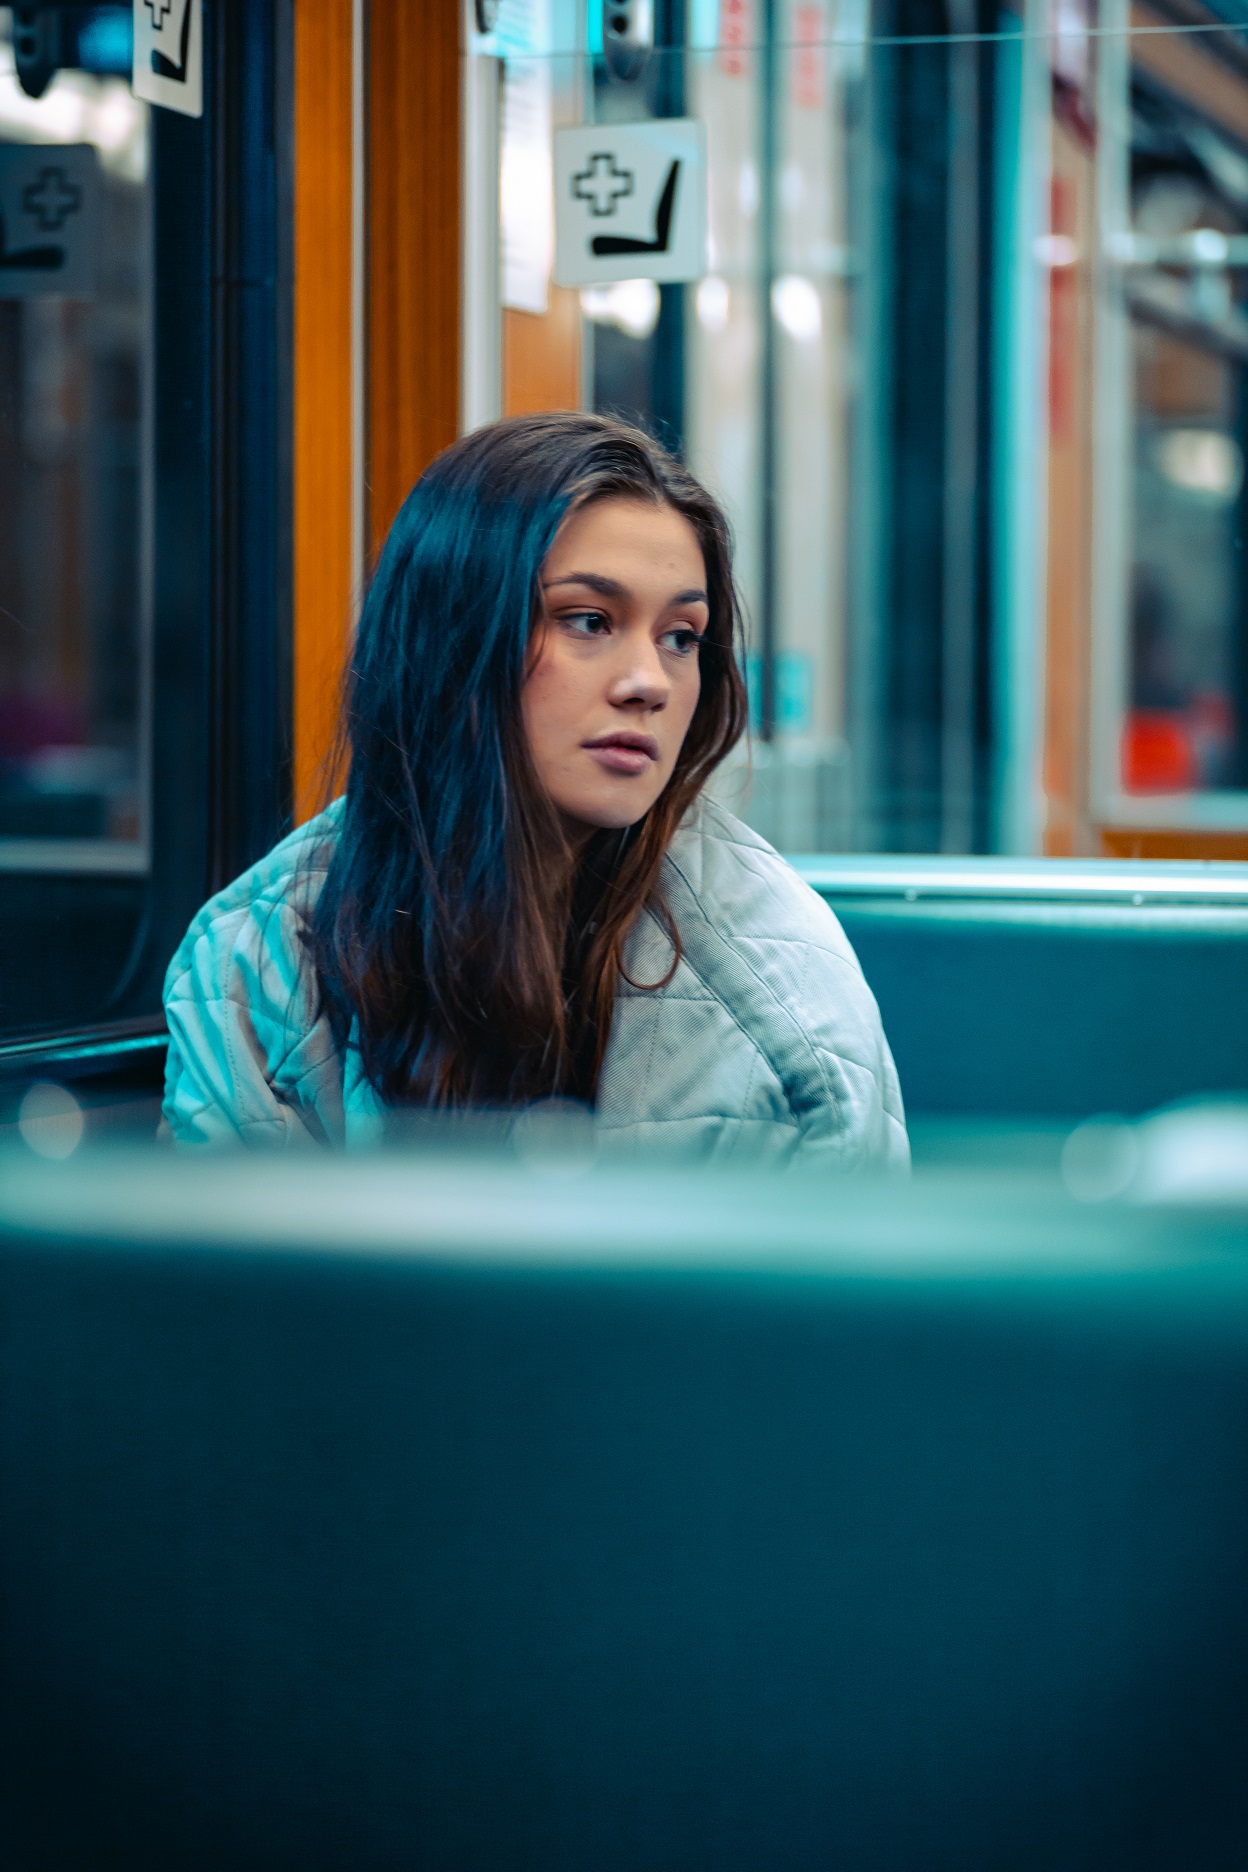
The photo was taken in a Munich subway. Accordingly, the lighting conditions were relatively dark, hence the choice of an aperture of f1.8. Even with such a wide open aperture, the ISO value is at 1000, which is bearable. I also like the composition of the picture, BUT:
If you look closely, the photo is unfortunately not crisp, we can only speculate as to why, because it is not entirely certain whether, with a recording time of 1/125 seconds, there was a slight shaking when the shutter was released or the focus has not been exact on point. However, I’m betting on shacking. Because the lens on the camera was an 85 mm lens, and thumbs up, they say the minimum exposure time is the focal length times x 2 in a fraction second:
85 mm x 2 = 170 would mean the photo would have been sharp with an exposure time of 1/170 second.
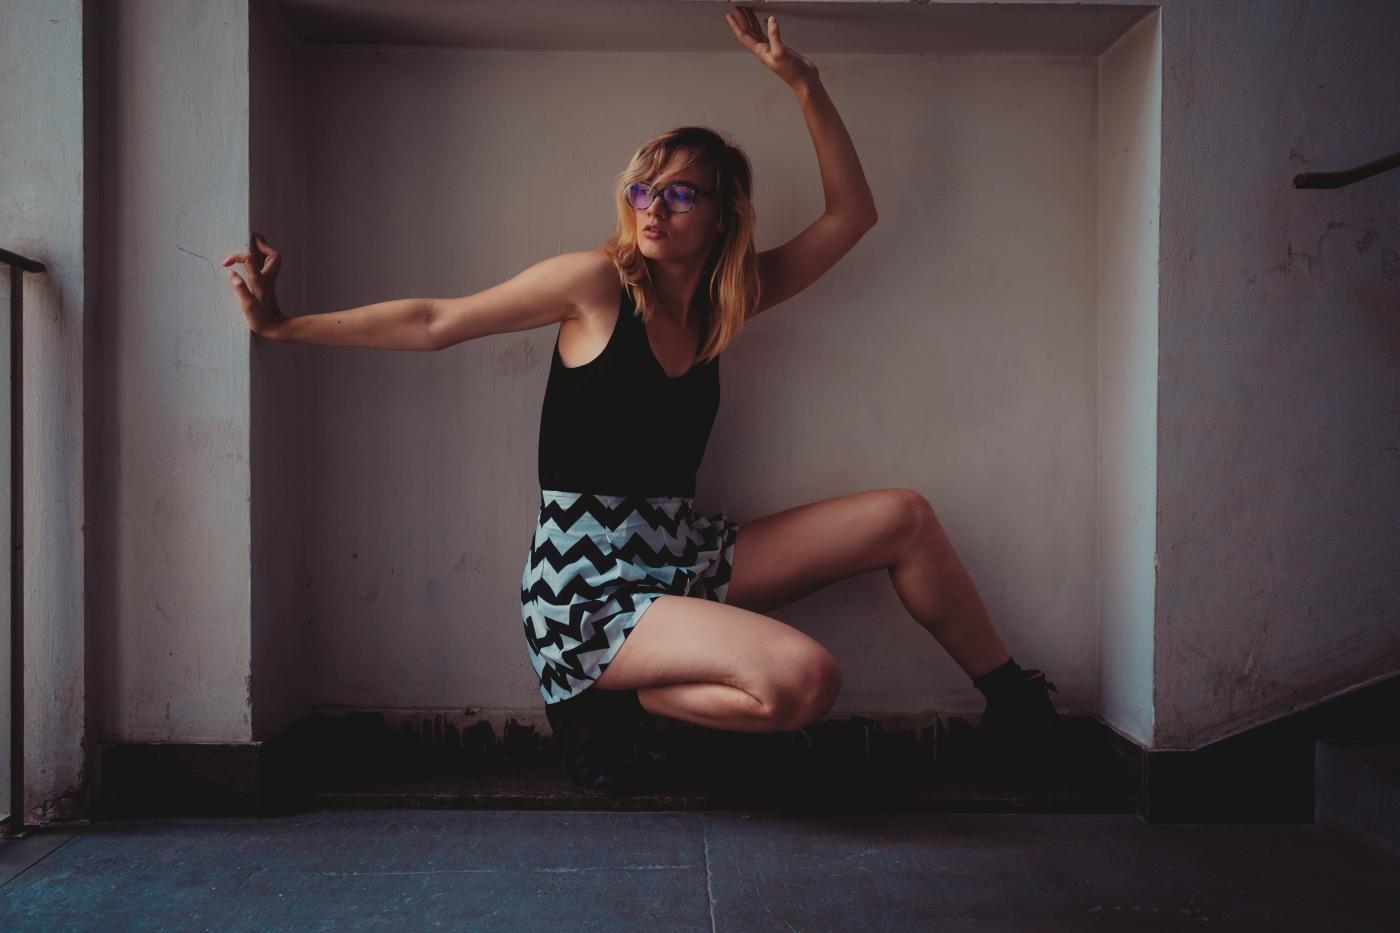
This photo was taken at the University of Munich. The light falls through a large window in the stairwell and is therefore very advantageous, creating drama and atmosphere.
In this case, I wanted the model to be consistently sharp without sacrificing quality. The fact that Annie is fully focused is due to the relatively open aperture of f5. Since my lens has a 35 mm fixed focal length in this case (35 x 2 = 70 ERGO an exposure time of 1/70 second could work well), I chose an exposure time of 1/100 second to be on the safe side, so that nothing gets blurred. The resulting ISO value of 400 does not damage the image.
Aperture and shutter speed are all well and good, but is there an easier way to avoid having to adjust the ISO every time?
Set Exposure Compensation instead of ISO
To get to the point, I rarely set the ISO. Instead, I set the “exposure compensation“. In the camera menu it looks like this:
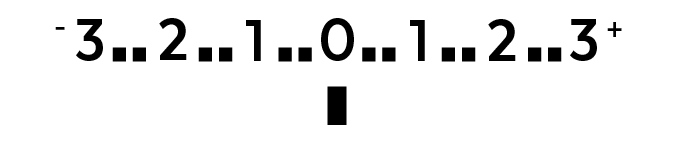
If you set the ISO to automatic in manual mode, it depends on the specifications that you select in the exposure compensation. If you set the numbers to a minus value, the image will be slightly underexposed and the camera will reduce the ISO value, if you set the “exposure compensation” to the plus range, the camera will increase the ISO value and the image will be slightly overexposed. If you keep the value at 0, the camera automatically sets the ISO to the optimal value in order to perfectly illuminate what is in the automatic focus.
Why is that easier than setting the ISO each time?
Of course, setting the ISO manually is a good option, but you save one more setting to take care of if you let the exposure compensation control the ISO on automatic. In addition, it can be used flexible: If the lighting conditions are more or less too dark, and you are concerned that the automatically set ISO will be too high, you can set the “exposure compensation” to a negative value (such as -0.5 or 1).
This allows me to fully focus on the aperture and exposure and to bring the underexposed details from the RAW files of the image back later in post-production, for example in lightroom. Provided you photograph in RAW and not exclusively in JPEG! Unfortunately, in the JPEG format, you lose a lot of details that are in the shadows.
So much for our little introduction to the basics of the manual mode, once you understand and internalize these modes, you’ll have them in your toolkit, and it’ll improve your photography massively because it opens a bunch of new doors.
If you’re ready to take it one step further, you could learn more about composition or ways to find a model to work with you.